Launching a new digital product—whether it’s a SaaS platform or internal software—starts with a critical decision: what should you build first?
The answer isn’t everything.
It’s a minimum viable product (MVP) that allows you to solve a core problem, validate assumptions, and gather early user feedback.
Many famous SaaS MVPs started with lean, focused versions that proved their value before scaling. In this guide, we break down the complete MVP development process so you can do the same—moving from idea to validated product with speed, clarity, and confidence.
What is a minimum viable product?
A minimum viable product (MVP) is the most stripped-down version of a product that still delivers value to early users and provides insights for future development. It’s a purposeful build designed to validate assumptions, reduce development waste, and quickly test market demand.
At its core, an MVP allows startups and product teams to launch with just the essential features necessary to solve a specific problem for a specific user. This makes it possible to gather feedback and iterate before investing heavily in complex functionality that users may not even want.
By focusing on functionality over perfection, you reduce the time and resources required to get your product into users’ hands. More importantly, you gain real-world insights that are more reliable than opinions or assumptions.
MVPs are essential for creating products that people actually use—especially in the SaaS world, where agility and user data are the driving forces behind sustainable product growth.
How does a MVP differentiate from PoC and prototypes?
It’s common to hear “MVP,” “proof of concept,” and “prototype” used interchangeably—but they serve different purposes at different stages of product development.
Prototype: This is a design or simulation of a product’s interface. It’s used primarily during the design phase to test usability and design direction. Prototypes are not functional products; they often consist of mockups or clickable wireframes created to gather internal or external feedback before development begins.
Proof of Concept (PoC): A PoC is a technical experiment to verify that a specific idea, feature, or technology can be built. It’s often used internally to reduce technical risk, validate feasibility, or demonstrate viability to investors. PoCs aren’t built for users and are not intended to be launched or tested with customers.
Minimum Viable Product (MVP): Unlike the above, an MVP is a real, usable product with just enough functionality to satisfy early adopters and provide learning opportunities. It’s designed to be launched publicly, not just tested behind the scenes.
Here’s the key difference: prototypes and PoCs help you make internal decisions; MVPs help you make market decisions.
An MVP is the first true version of your product, and it sets the stage for data-driven iteration. It’s where user behavior—not just user feedback—starts shaping what comes next.
The 8 different types of MVPs
There’s more than one way to validate a product idea. Choosing the right type of MVP depends on what you're trying to learn, how much you’re willing to invest upfront, and what stage you’re in. For founders building SaaS products, understanding these eight MVP types helps shape a smarter MVP development process and reduce wasted development cycles.
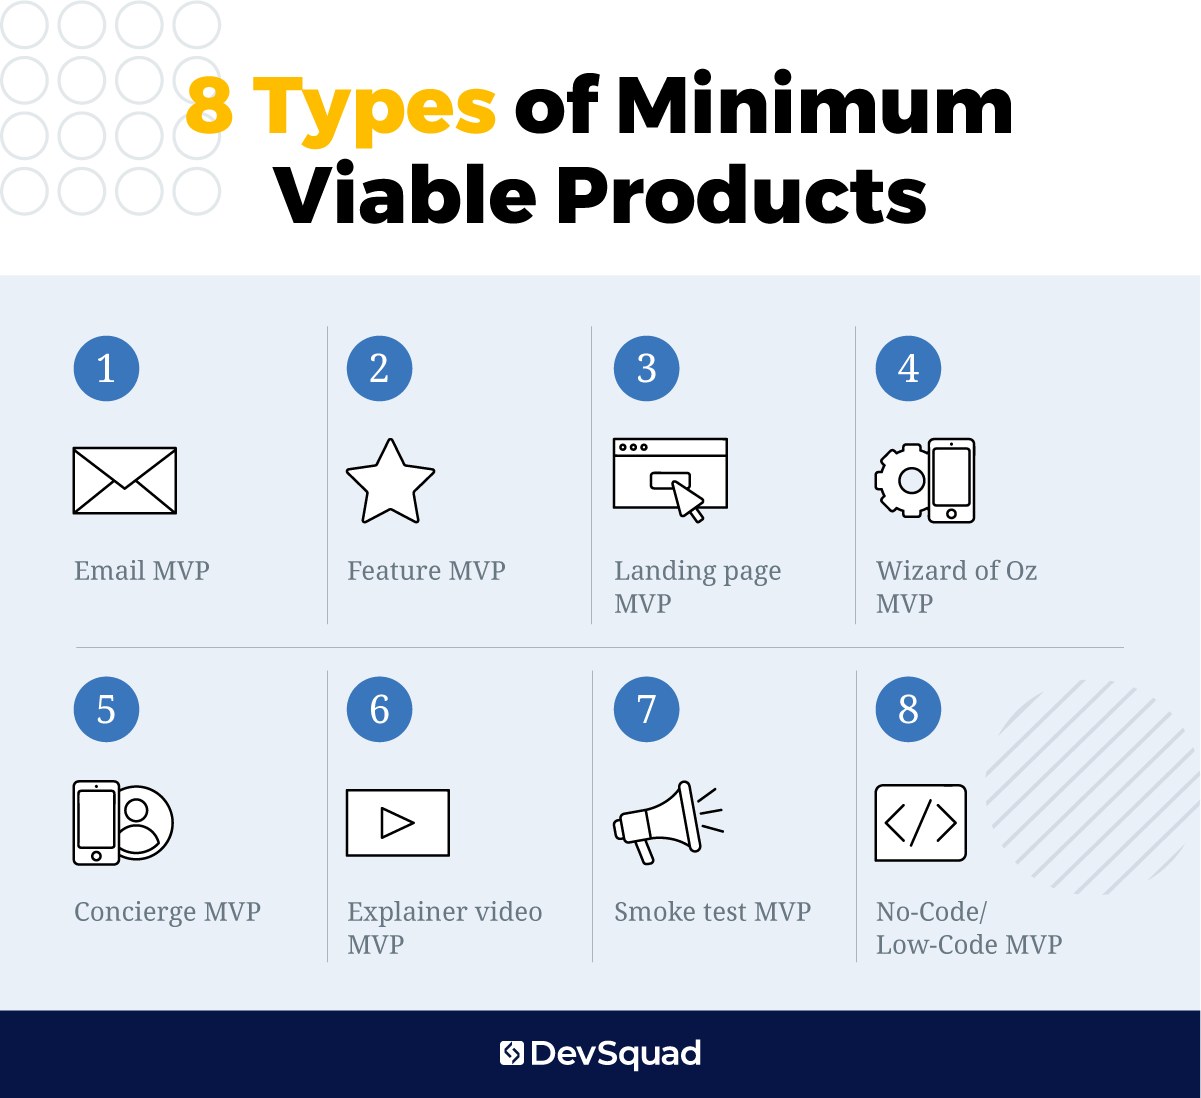
1. Email MVP
One of the fastest ways to test an idea is by reaching out directly. Email MVPs are especially useful for startups with existing lists or warm leads. You send a short pitch or product description to your audience, collect replies or click-throughs, and gauge interest before building anything. It's a lightweight MVP development step that gives you quick validation or red flags.
2. Feature MVP
Sometimes it’s not about testing an entire product, but instead it’s about validating a single function. Feature MVPs help you answer whether a specific capability is valuable to users before integrating it into your broader solution. This approach works well midstream, especially when you're iterating during the MVP product development process.
3. Landing page MVP
Landing page MVPs are one of the most common forms of validation. You build a single page that communicates your product’s value, then track how users respond—via clicks, signups, pre-orders, or demo requests. This method works well as a starting point in MVP development planning and is often paired with paid traffic to accelerate learning.
4. Wizard of Oz MVP
This type mimics a fully functioning product on the front end while human effort handles tasks on the back end. It’s a high-fidelity option in the MVP process. And while it will cost more upfront, it’s great when you need to see how users behave with simulated software. This is especially true when building automation or logic-heavy systems.
5. Concierge MVP
Like the Wizard of Oz model, this version involves humans delivering the experience manually. But here, there’s no illusion of automation. Instead, users know they’re interacting with a person. It’s an excellent approach for gathering rich qualitative feedback and refining early service workflows in MVP development for startups.
6. Explainer video MVP
Sometimes, showing is better than building. An explainer video MVP lets you illustrate your idea, demonstrate functionality, and invite user feedback—all without writing a line of code. You track engagement and reactions to determine whether your messaging lands and if your concept resonates.
7. Smoke test MVP
You can learn a lot before you even mention the word "beta." With a smoke test, you launch ad campaigns, social posts, or mock landing pages to test demand for a concept. It's a fast and affordable tactic to measure market appetite and is often used in the early MVP development planning phase.
8. No-code/Low-code MVP
If you need to simulate real product flows without the full expense of custom development, a no-code or low-code MVP gets the job done. Tools like Bubble, Webflow, or Glide can help you build clickable prototypes or basic functionality. While it won’t replace custom software, it’s a smart way to validate core workflows and interfaces during the MVP development process.
The benefits of having a MVP development process
A clear and strategic MVP development process does more than speed up launch. It helps product teams build smarter, reduce waste, and make decisions based on real data—not assumptions. Here are the key benefits:
Faster time to market: Launch quicker and start learning from real users sooner.
Agility and adaptability: Make changes based on feedback without disrupting the entire roadmap.
Keeps product development on track: Focuses your team on solving the core problem without overbuilding.
Team alignment: Ensures everyone—from leadership to engineering—is working toward the same outcomes.
Minimized resource waste: Reduces time, money, and effort spent on unnecessary features.
Supports iterative development: Enables continuous product evolution based on real-world input.
Data-driven decision-making: Empowers teams to prioritize features and updates based on usage data.
Early user feedback: Surfaces usability and value gaps while there’s still time to address them.
Reduced risk of failure: Validates product-market fit before full-scale development.
Faster path to revenue: Offers enough value to start charging or acquiring early adopters.
Builds stakeholder confidence: Demonstrates traction and learning, not just concepts and ideas.
9 steps of the MVP product development process
Now that you understand the value of a minimum viable product and the different ways to approach it, let’s walk through the nine essential MVP development steps.
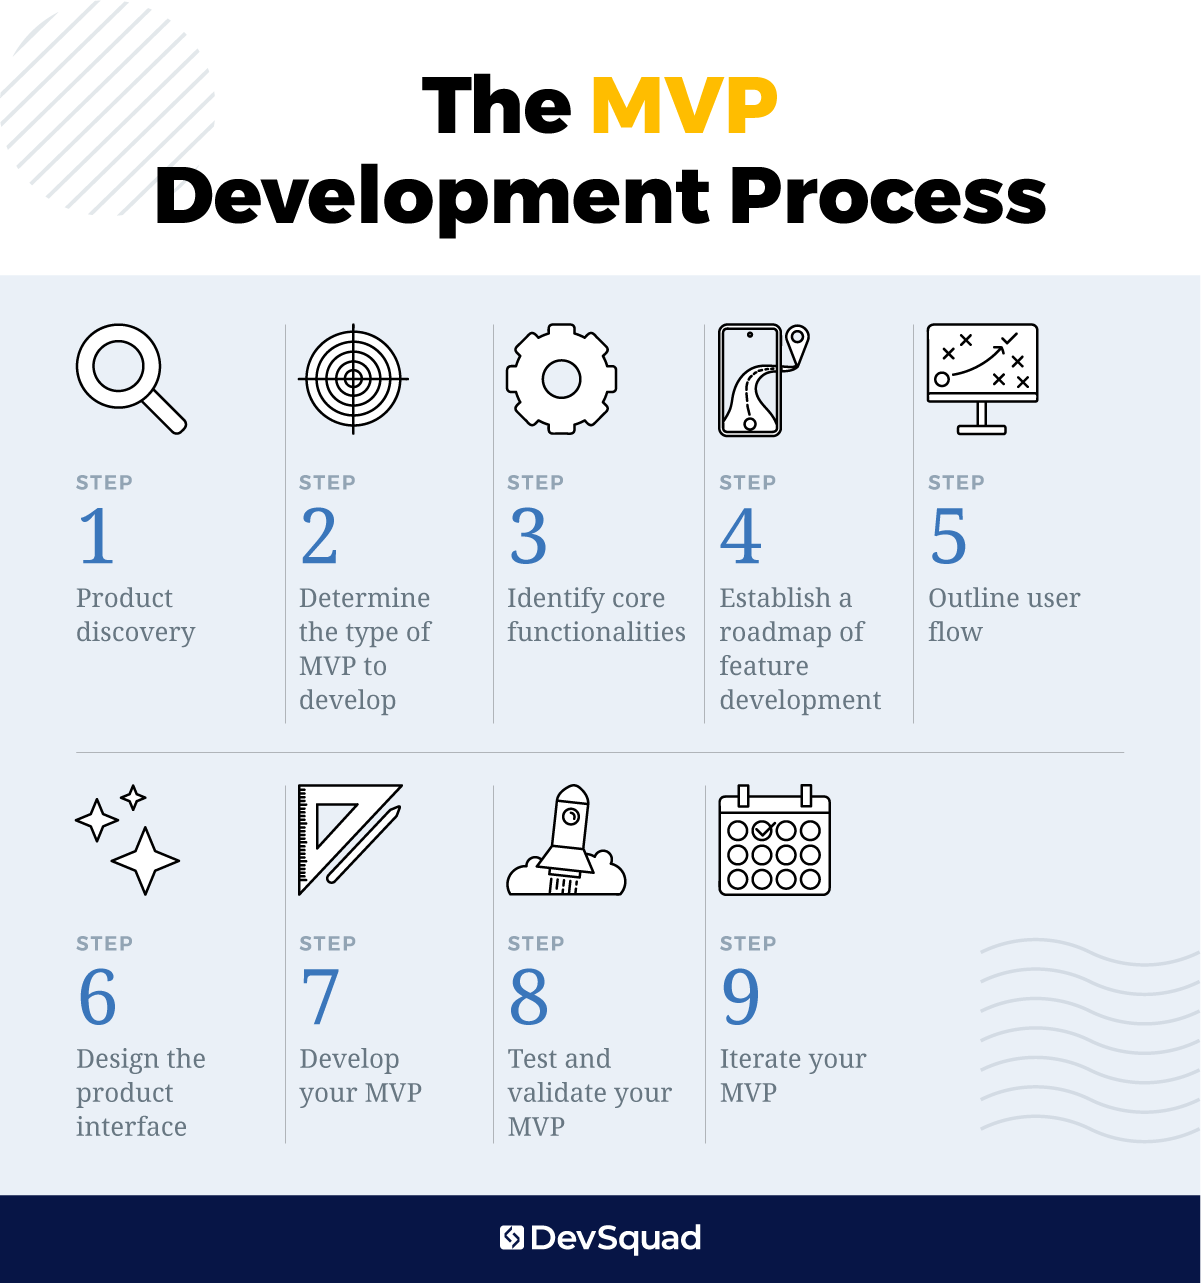
Step 1. Product discovery
The first step in any effective MVP development process is product discovery. This is where you dig deep into your market, your users, and the problem you're trying to solve—before writing a single line of code.
This phase is about understanding user needs and validating assumptions through a mix of structured research and strategic planning.
Key activities in this phase include:
Market and user research: Interview prospective users, analyze competitor offerings, and assess trends. The goal is to identify clear, validated pain points that your product is uniquely positioned to solve.
User personas: Develop detailed profiles of your target users based on research. These personas should include motivations, goals, challenges, and behaviors to help guide product decisions.
User journey mapping: Visualize how users will interact with your product from first touch to end goal. This helps identify friction points, missed opportunities, and must-have features.
Use a product discovery framework: Leverage established models—such as the Double Diamond or Opportunity-Solution Tree—to help structure your thinking, reduce bias, and prioritize what to validate first.
Run a product discovery workshop: If you’re collaborating with stakeholders, product managers, or an outside development partner, a discovery workshop can bring clarity and alignment to the MVP planning process.
Step 2. Determine the type of MVP to develop
Based upon your research, objectives, timeline, and budget, the type of MVP you’ll want to develop will be clear. If not, now is the time to decide as it will shape the rest of the MVP development process.
Choosing the right MVP format ensures you’re validating the right thing at the right time. Refer back to the earlier breakdown of MVP types and select the one that gives you the fastest path to insight, not just the fastest build.
Step 3. Identify core functionalities
Once you’ve selected your MVP type, it’s time to decide what it will actually do. This step is about identifying the absolute must-have features—nothing more.
Feature bloat is one of the top reasons startups fail, and it’s especially common (and costly) in SaaS MVPs. When you try to do too much too soon, you delay validation, confuse users, and waste valuable time and resources.
This is where a technical product manager becomes critical. They help bridge strategy and execution, keeping the team focused on building only what’s necessary to test your value proposition. Their job is to challenge assumptions, cut through nice-to-haves, and define a core feature set that aligns with user needs uncovered during discovery.
If your MVP doesn’t feel a little uncomfortable in its simplicity, you probably haven’t trimmed it enough.
Step 4. Establish a roadmap of feature development
Once you’ve defined your core features, you need to decide when and how the rest of your product will come to life. A clear MVP development roadmap outlines what will be built now, next, and later. That way the team doesn’t lose sight of long-term goals while staying focused on immediate validation.
This roadmap should prioritize speed to insight, not speed to scale. In fact, early versions of your MVP may include manual processes that later become automated. For example, instead of building a scheduling algorithm, your team might manually match users to resources while you validate demand.
Step 5. Outline user flow
User flow is the sequence of steps a user takes to accomplish a specific goal within your product. Defining these flows early helps your team focus on functionality that directly supports the user journey. It also helps identify any unnecessary friction or complexity.
By outlining user flow, you gain clarity on what the user needs to do and what the product must support in its first version. This step simplifies decision-making around interface design and keeps development efforts aligned with user priorities.
The flowchart below from Creately illustrates a basic example of how a user might navigate an app. It covers actions like signing up, enabling location settings, searching for friends, and rating the app:

Even if your MVP will not include every feature shown, mapping the complete user journey helps you decide what to build first and what to save for future iterations. Start with one primary user goal. Then, build a simple flow that supports that outcome without extra steps or distractions.
Step 6. Design the product interface
Your MVP should feel like a real product, not a rough draft. Even though it has limited functionality, the interface should be just as polished and user-friendly as the final version.
This is where strong design makes a major impact. Users will judge your product’s value within seconds, and clunky design can create friction—even if your core feature is strong.
Design each screen based on your user flow, focusing on clean layouts, intuitive navigation, and thoughtful interactions. You may only be building a few features, but the experience needs to feel complete.
If design isn’t your strength, bring in an MVP designer that understands product design principles to help. This step can make or break user adoption, especially in competitive SaaS markets.
Step 7. Develop your MVP
With research, flow, and design in place, it’s time to build. Your roadmap is your blueprint. Whether you're using in-house developers or outsourcing MVP development, stick to the plan you set.
Avoid adding features midstream. This is where many teams derail their MVP process. Build only what’s needed to deliver your core value and test your assumptions.
Remember, the goal is to launch quickly, gather real feedback, and validate your product direction. That’s what moves you forward
Step 8. Test and validate your MVP
Once your MVP is live, your job shifts from building to learning. Testing should cover both functionality and usability to confirm that the product works as intended—and that users understand how to use it.
But testing alone isn’t enough. You need to validate your product in the real world. That means tracking user behavior, gathering feedback, and comparing results to your original assumptions.
Make sure you know how to validate a software product before jumping into feature changes or scaling. Product validation is about proving that users not only want what you’ve built, but that they’ll continue using it or even pay for it.
Step 9. Iterate your MVP
Launching, testing, and validating your MVP is a great accomplishment, but it is also just the beginning.
Now it’s time to apply what you’ve learned and improve the product through focused, strategic iterations. This is where real product development begins. Use actual user data—not opinions—to prioritize updates, remove friction, and expand functionality where it adds value.
This ongoing product iteration process is what transforms an MVP into a market-ready solution. Keep responding to feedback, solving real problems, and staying aligned with your users.
Founders who succeed don’t stop at validation. They keep shipping, testing, and improving.
Start on the right track from the beginning
Your MVP sets the momentum for everything that follows. A smart, focused MVP development process helps you avoid false starts, wasted budget, and missed opportunities. It gives you clarity, confidence, and a clear path to delivering real value to your users.
But not all development teams follow this kind of process. If you're working with a partner, make sure they have a proven framework that’s built around discovery, validation, and iteration.
At DevSquad, we don’t just build MVPs—we guide founders through the entire product journey. Our process is built into how we operate, and we don’t keep that knowledge to ourselves. When it's time to hand off your product, we train your internal team to continue the product iteration process with clarity and purpose.
Ready to launch a software product the right way? Work with DevSquad to build your MVP.

Dayana Mayfield is a SaaS copywriter and content marketer specializing in SaaS marketing, positioning, and go-to-market strategy. She has consulted for over 195 SaaS companies, focusing on both traffic and conversions. She has been featured in Entrepreneur, Forbes, and Business Insider. Outside of work, Dayana writes SciFi novels and spends her evenings surviving auditions, rehearsals, and tech week as a proud theater mom.