You want to align everyone on your team around a common vision.
You want to get feedback on your product before you spend hundreds of thousands of dollars developing it.
You need a low-fidelity prototype.
It gives you something concrete to share with stakeholders and potential customers so you’re not circling the drain with the same back-and-forth, wishy-washy conversations.
In this guide, we dive into the difference between low-fidelity and high-fidelity prototyping, how we fit prototyping into our digital product development process, examples of our own work, and the top tools to use to create your own prototypes.
What is low-fidelity prototyping?
Low-fidelity prototyping is part of the product design and development process. It involves creating early versions of a product or design using inexpensive and quick methods. These prototypes are often rough and basic, and are used to test and evaluate ideas before committing to a more detailed and polished design. Low-fidelity prototypes are often created using simple materials, sketches, or wireframes and don’t include all of the features or functionality of the final product.
Low-fidelity prototyping exists to reduce risk. Before teams invest months in development, they need a way to test structure, flow, and assumptions. A low-fidelity model allows product teams to answer critical questions early: Does this make sense? Is the user journey intuitive? Are we solving the right problem?
“The biggest risk is building something nobody wants.” — Eric Ries author of the Lean Startup
Low-fidelity prototypes are one of the fastest and least expensive ways to eliminate that risk.
Defining fidelity
But what is fidelity? Fidelity is essentially how true-to-life something is. Low fidelity means it’s not realistic, while high fidelity means it’s as realistic as it can be (without requiring actual product development, which shouldn’t occur until you’ve collected customer feedback and validated the concept as worth your time and investment).
Fidelity can be absent or present for:
Visual design - How well does the prototype match the desired final design?
Content - How well does the prototype reflect the finished content? (For instance, having some real content instead of all lorem ipsum)
Interactivity - How interactive is the prototype? How does this align with the planned product?
Functionality - Even though a prototype shouldn’t be fully functional, does it at least mimic what that functionality will achieve or produce?
Low fidelity does not mean careless or incomplete. It simply means intentionally simplified.
Low-fidelity prototypes remove visual polish and deep functionality so teams can perform rapid prototyping and focus on what matters most at this stage:
The core user journey
The structure of information
The flow between screens
The clarity of the problem being solved
High-fidelity prototypes, on the other hand, begin to simulate final visuals, content, and interactions more closely. More on distinguishing the two later.
Low-fidelity prototype requirements
Every product development team will have their own requirements for prototypes. At DevSquad, we think prototypes are most useful if the UI/UX matches the expected design closely in terms of layout and functionality, but not color, style, or content. We also don’t expect low-fidelity prototypes to be interactive, but we do often link mockups or wireframes together, so that if you click a button, you’ll be taken to the next appropriate screen. (Keep reading for examples.)
More specifically, we believe an effective low-fidelity prototype should:
Clearly map the primary user journey from start to finish
Reflect realistic layout and screen hierarchy
Demonstrate how core features will connect
Remove branding, color systems, and final design polish
Avoid deep functionality or engineering complexity
Be easy to revise based on feedback
Support stakeholder and user validation conversations
These requirements allow us to develop low-fidelity prototypes that serve their key purpose: getting feedback from stakeholders and moving to the next stage in development.
Why is low-fidelity prototyping important?
Prototypes offer a lot of benefits. When you rush straight to development, you miss out big time.
Here’s why this step matters:
1. It’s fast
Across every product category, prototyping is infinitely faster than product development. You can create a prototype in days or weeks instead of months, allowing you to get feedback faster.
2. It aligns stakeholders
A prototype allows you to get agreement from stakeholders before deciding to invest in a high-fidelity prototype, which will take longer to produce and cost more too.
Essentially, low-fidelity prototyping serves as a fail-safe against internal confusion, lengthy meetings and conversations, and uncertainty. It allows you to get something concrete in front of stakeholders for practical feedback.
Before working with DevSquad, the BoosterHub team spoke with multiple firms that were ready to give them a quote immediately. Instead of jumping straight to development, DevSquad guided them through a structured discovery and prototyping process to clarify priorities and align stakeholders. That alignment prevented costly missteps later.
3. It improves user research
We’ve been dropping the word “feedback” a lot. Low-fidelity prototypes not only let you collect real, clear feedback from stakeholders but from your target users as well.
You can conduct more formal user testing, where you show users your prototypes with no explanations and record their behavior, interactions, and responses. Or, you can simply show them the prototype and ask them for their feedback or have them answer a series of questions.
Here are some things you might ask:
How does this compare to the product you’re currently using or to your current process?
Would this contain all of the information you need?
Is there a feature or piece of information you were expecting to see here that we didn’t include?
If we were to build this product,
4. It saves money (no pointless builds)
Because you can get feedback quickly and repeatedly, low-fidelity prototyping can save you big. A single misunderstood feature can cost weeks of engineering time. A poorly defined user flow can require a full rebuild. Low-fidelity prototyping surfaces these issues when changes are still inexpensive.
You won’t build a product that your users have no need for, or that doesn’t satisfy all of their expectations. You’ll be getting feedback before you commit.
5. It supports agile development
Agile product development is considered best practice, while waterfall product development is best avoided. Why? When you work in an agile way, you rapidly deploy features, get feedback on them and reiterate. Whereas with a waterfall methodology, you develop the entire product in one chunk—meaning that by the time you finish, your product might be outdated or not in line with customer expectations.
Prototyping is an essential part of the agile project management process because your team will find it easier to make changes to rough versions of the project than to develop the entire thing and then have to adapt to feedback.
6. It lets you test-run collaboration styles
To build a SaaS startup the right way, you can't go it alone. You'll be collaborating with a software development agency. You might have a co-founder as part of your team, or a potential investor.
When you develop a low-fidelity prototype, you have the chance of working with stakeholders and the firm you plan to hire—before you invest $90,000+ in developing the final product.
Low-fidelity prototyping gives founders a chance to evaluate more than just the product idea. It reveals how decisions are made, how feedback is handled, and whether communication is clear.
7. It clarifies founder commitment
Being an entrepreneur is exhausting. There's a big upfront investment of time, money, and energy, and you might never make it to the breakeven point, even if your idea is solid.
By first developing a low-fidelity prototype, you'll get a chance to test your own commitment. Do you care enough about the target audience and problem to risk your own money and time? Is this the right product? Do you have the energy and capacity to tackle it right now?
Many founders realize during prototyping that their idea needs refinement. Some pivot. Some narrow their focus. And some gain renewed confidence. All of those outcomes are better than discovering misalignment after investing six figures.
How does low-fidelity prototyping fit into the product development process?
Prototyping should come early on. The process typically follows this order: discover the target user’s problems and understand their needs, brainstorm solutions, choose the best approach, prototype it, get feedback from stakeholders and users, launch the first version of the prototype and start earning revenue, collect more feedback and improve the product.
Of course, product development looks different for every company.
We create prototypes for every product we take on, and it is a critical part of our own product development process. Early on at DevSquad, we used Google’s Design Sprint methodology.
It’s a five-step process that looks like this:
Map - Brainstorm and map out the user stories (user problems and requirements)
Sketch - Sketch out possible solutions to solve these user stories
Decide - Choose the best solution to move forward with
Prototype - Create a prototype of the solution
Test - Share your prototype with users and get their feedback
Once the product is validated, you then move on to product development.
You can learn more about Google’s Design Sprint method in this short video.
It’s still an excellent methodology, but through the years, we’ve honed our own signature approach.
Now, our product development process looks more like this:
 We run 4 to 6 weeks of discovery sprints for new clients. We customize the discovery process based on their needs. One client might just have a rough understanding of their target audience’s problems, while another might have a fully-fledged product idea. Through various discovery iterations, we continuously come up with new product ideas and sketches and determine if they’re worth building.
While this process is individualized, one thing remains at the forefront. During discovery sprints, we are not building software.
Discovery is about validating assumptions. Each iteration focuses on answering one critical question: Is this worth building?
Discovery includes:
Clarifying the core user problem
Refining user stories
Sketching multiple solution paths
Rapidly prototyping potential workflows
Testing concepts internally and externally
Narrowing scope to the highest-value features
Rather than assuming the first idea is correct, we run multiple “worth building?” checkpoints before committing to delivery.
Once we come up with the best solution to the most pressing user problem, we then create a low-fidelity prototype. We get feedback on this from all stakeholders before moving on to the high-fidelity prototype. We then share that prototype with target users to ensure that it covers their expectations and would actually solve their core problem. Then, we run the development sprints required to launch version 1 of the product.
This process can be seen in the work with our clients. For example, when working with ParentPulse, our team approached discovery as if the product were our own. Instead of rushing into development, we pressure-tested assumptions, refined user flows, and validated the concept before advancing. The result, a bootstrapped profitable business.
Low-fidelity vs. high-fidelity prototyping: what’s the difference?
Low-fidelity prototypes are less function and look less like the finished product than high-fidelity prototypes. Most importantly, low-fidelity prototypes are a step in the process towards a high-fidelity prototype. The real distinction between low- and high-fidelity prototyping isn’t just appearance — it’s purpose. Each serves a different role in reducing risk and preparing for development.
Specifically, low-fidelity prototyping focuses on:
Structure and user flow
Core problem validation
Screen hierarchy and navigation
Eliminating confusion
Fast iteration and rapid revision
Minimal visual design (often black and white)
Low cost and low emotional attachment
Whereas the focus of high-fidelity prototyping includes:
Visual polish and branding
Realistic content and copy
Detailed UI components
Clickable interactions and transitions
Refining usability before development
Stakeholder and investor presentations
Preparing for engineering handoff
The key difference comes down to investment and confidence. Low-fidelity prototypes test whether the idea works. High-fidelity prototypes test whether users want it and understand it in a near-real experience. Each stage builds confidence before the next level of investment.
At DevSquad, we believe that while low-fidelity prototypes shouldn’t be functional, they should have UX that closely matches the proposed solution so you can collect user feedback. We typically design low-fidelity prototypes in black and white. Meanwhile, our high-fidelity prototypes are in full color, contain more content, and are clickable.
This balance is critical. If a prototype is too abstract, users struggle to give meaningful feedback. If it is too polished too early, teams risk becoming emotionally attached to the solution before validating it.
Types of low-fidelity prototypes for software development
Low-fidelity prototyping can take multiple forms depending on the complexity of the product and the stage of discovery. While UX design mockups are the most effective format for most SaaS products, simpler tools can sometimes be appropriate early on.
Analog
Analog tools are best suited for early brainstorming sessions, internal workshops, or extremely simple feature validation. They allow teams to move quickly without the friction of design software. However, analog prototypes are often insufficient for collecting structured user feedback because they lack clarity and visual hierarchy.
Here are some analog tools to use:
Sticky notes - You can use sticky notes to clarify user flows or requirements.
Sketches - You can actually sketch out the proposed solution or product.
Whiteboards - You can draw diagrams and product sketches.
Here’s an example of a user story drawn out on sticky notes:
 Woman purchasing a conference ticket – source
Typically, a user story diagram precedes prototype development and is not considered a type of prototyping. However, for a very simple product or new feature, you could go straight from an approved user story to development (although this isn’t recommended).
Digital
Digital prototypes introduce more structure and realism while still remaining flexible and inexpensive to modify. They are especially valuable when collecting feedback from stakeholders or target users.
These are the most common digital formats:
Digital wireframes - A wireframe is sort of like a rough layout of a digital experience. While not as accurate as UX design mockups, wireframes can serve as prototypes in a pinch.
Diagrams of user stories and user flows - While a diagram of user flows might not seem like a prototype, it can definitely serve the purpose of one. You need something that you can review and agree on as a team, and a diagram can definitely offer that. However, UX design mockups are the best option.
UX design mockups - UX design mockups are the best format for prototyping because they look as close to the final product as possible, but without any semblance of functionality.
Here’s an example of a low-fidelity digital wireframe template from the Figma community.
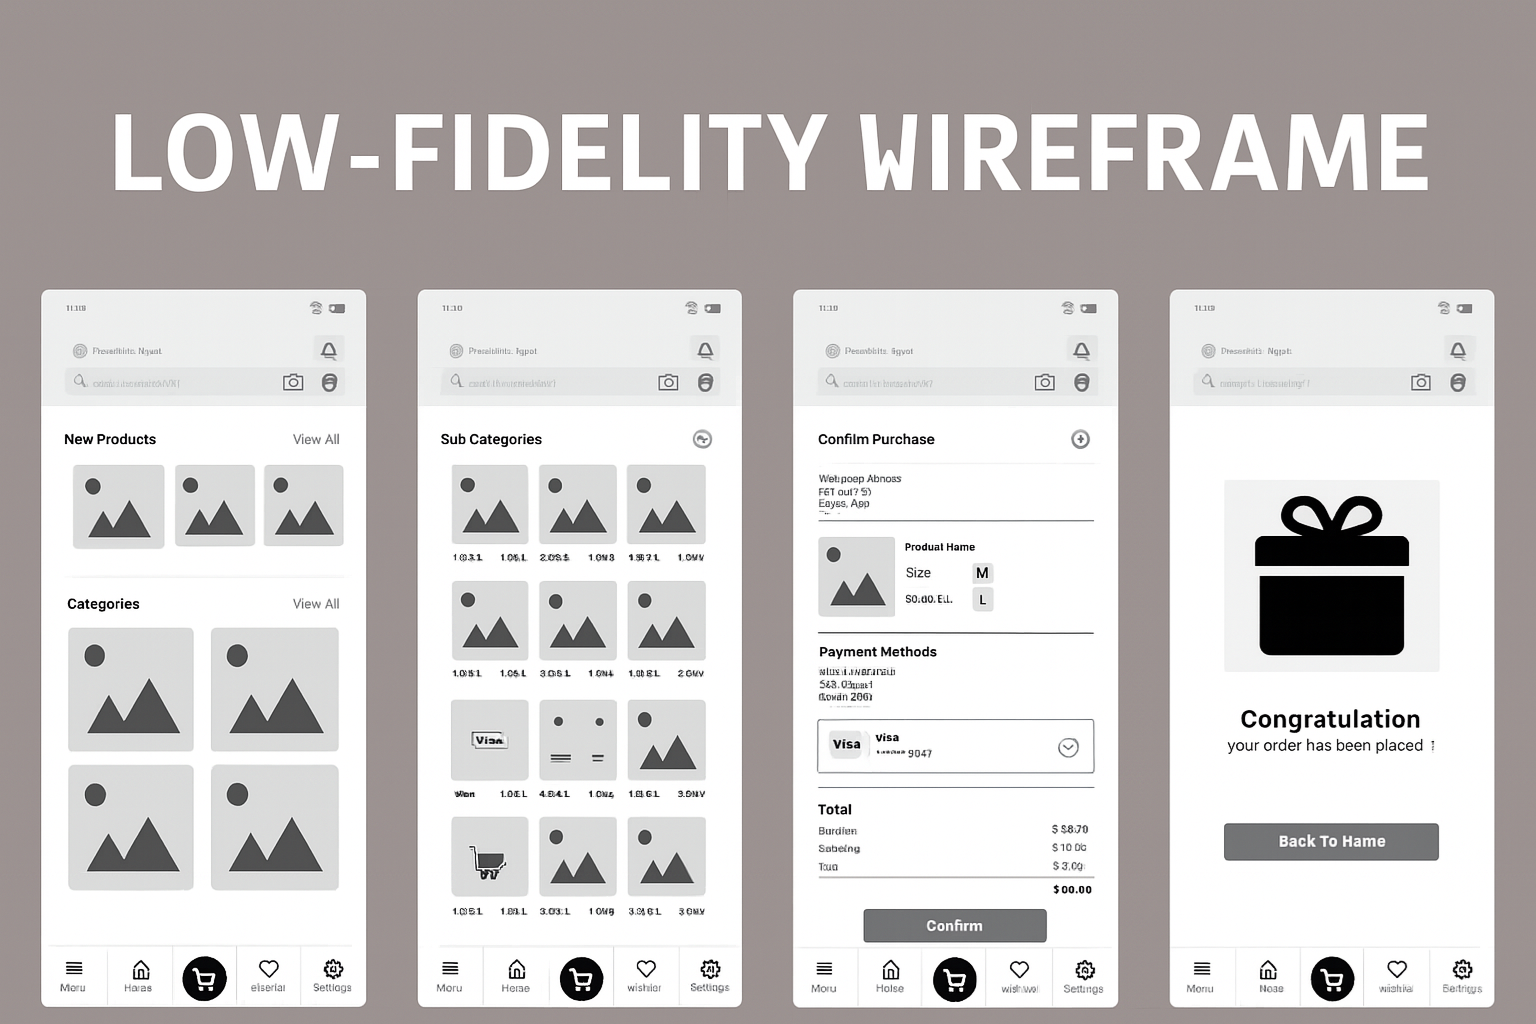 Digital low-fidelity wireframe template - source
Not all digital artifacts are equal in their ability to support validation. A wireframe may clarify layout, but it often lacks enough realism for meaningful user testing. UX design mockups strike the balance — structured enough to simulate the real experience, but flexible enough to iterate quickly.
Choosing the right low-fidelity format
The right format depends on what you’re trying to validate. The more investment required to build the product, the more structured your prototype should be.
Sticky notes / Whiteboards
Best for internal brainstorming
Mapping simple user flows
Early ideation sessions
Fast alignment among small teams
Wireframes
Evaluating screen hierarchy
Clarifying layout structure
Early digital exploration
Comparing multiple design approaches
UX Mockups
Stakeholder approval
Structured user testing
Validating usability before development
Preparing for high-fidelity prototyping
For most B2B SaaS products, UX mockups provide the clearest bridge between idea and validated solution.
Low-fidelity prototype examples
You might be surprised at just how true-to-life we think low-fidelity prototypes should be.
We make them black-and-white with no interactivity. But they are still close to the final UX so that everyone can see what the finished product will look and feel like.
Here are some examples from our design team here at DevSquad:
1. In-progress delivery routes
This UX design prototype shows an in-progress route in a map view, the stops, and accurate time stamps.
 2. Product stock forecasting
This product stock dashboard shows days until stock order, velocity, product name, and more.
3. Sales intelligence dashboard
With this sales team dashboard, sellers and managers can track their results.
 Top companies that offer low-fidelity prototyping
These companies offer low-fidelity prototyping as a service. You can explore their websites for more case studies and examples.
1. DevSquad
Best for: Software and digital products

DevSquad is a product development company based out of Utah. We include low-fidelity prototyping along with every project. We work in concurrent discovery and delivery sprints, meaning that we’re always including strategy, user discovery, and design so that we’re working in the most agile way possible.
The process for building a SaaS product typically starts by understanding what problem an entrepreneur or business leader is trying to solve. Then, we storyboard that into the most essential user flows. Next, we get agreement from the stakeholders and then develop the low-fidelity prototype. After we get feedback on that from the stakeholders, we create the high-fidelity prototype (a clickable version of the product with the full UI of V1 built out in Figma). From there, we collect user feedback and craft the backlog.
2. RapidMade
Best for: Industrial, automotive, and electronic products
 RapidMade offers 3D printing, manufacturing, and engineering services. The company serves a wide variety of technical and hardware-focused industries, including automotive, electronics, energy, industrial, medical, and robotics.
As part of an engagement with the company, you can work with them to develop both low-fidelity and high-fidelity prototypes before manufacturing a large quantity of your product. Their low-fidelity prototypes are typically CAD drawings or sketches, while the high-fidelity prototypes are typically 3D printed models using affordable materials. One of their example projects was the creation of a Multi Jet Fusion 3D printer to help Hoyt St Electric Skateboards craft and validate their own models.
3. Ristich
Best for: Consumer products
 If you’re looking to create a low-fidelity prototype for a consumer product, you might want to consider an agency like Ristich. They’ve built tumblers for Kurin, a menstrual cup for a Kickstarter campaign, and a brand marketing strategy for Hikawa. Their focus on user expectations, brand marketing, and product development means that they know how to link prototyping with market demands.
Best low-fidelity prototyping tools
Ready to create your own low-fidelity prototypes? While Figma is our favorite, other tools can handle the job too.
1. Figma

Figma is a popular tool for UX design, low-fidelity prototyping, and high-fidelity prototyping. It’s great for creating beautiful, modern designs and collaborating as a team.
2. Miro

As a visual collaboration platform, Miro can be used for user stories, diagrams, wireframes, and very rough prototypes. It’s great for running discovery workshops, but Figma is better suited for realistic prototyping.
3. Conceptboard

Conceptboard is a collaborative online whiteboard similar to Miro, but with additional enterprise security features for companies looking to make their online collaboration more secure.
4. Lucidchart

With Lucidchart, you can create detailed diagrams, user stories, and product wireframes. It’s great for the discovery phase of the process, or for replacing standard prototypes with other digital formats. But for realistic mockups, use Figma or Mockitt.
5. Mockitt

Mockitt is a UX design and prototyping tool that is more popular among website designers, while Figma is more commonly used by app developers.
How to create a low-fidelity prototype in 7 steps
A low-fidelity prototype is not interactive, clickable, or functional. But it should still have fidelity in terms of design. With the UX and product layout close to the proposed product, you’ll be able to get more accurate feedback. If the prototype looks nothing like the proposed product, your user and stakeholder feedback won’t be very accurate.
That’s why you need a skilled UX designer to create the prototype. They can lay out the UX and user flows the way they best see fit based on the target user and goal functionality.
All of the above tools are perfect for creating low-fidelity prototypes, and they all offer extensive tutorials to walk you through the process.
To strategically create a low-fidelity prototype worth testing, follow these steps:
Step 1. Define your target users and their problem
The first step is to wrangle all of your stakeholders and sit down together. In your meeting, get very clear on your ideal target users and the problems they're facing. Ideally, you'd be able to define your target users in terms of their role or title, industry, and company size. Jot down the top three to five problems that they're up against.
For example, an office manager who must manage travel bookings for her company has to deal with finding flights and hotels, coordinating times with travelers, staying under budget, and delivering invoices to the finance team.
Step 2. Brainstorm multiple solutions
Once all stakeholders have agreed on the target audience criteria and core problems, it's time to discuss solutions.
Come up with a handful of ways that you might solve this problem. Discuss multiple types of products, from simple tools to all-in-one platforms. Consider what will truly solve the problem, but be creative and don't be afraid to stab the problem in different ways.
Step 3. Map out the best solution with a story map
Now, it's time to create a story map to match the solution you plan to move forward with.
Not sure which idea to choose?
Consider these elements when choosing the best solution:
Technically feasible
Affordable to create V1
Better than existing competitors
Addresses the core problems most directly
The story map lists the core tasks and subtasks users need to take to achieve their ultimate goals.
You should be able to break up the all of the essential user flows, including sign up and any other actions they'll need to take to get to their final destination, whether that's creating and sharing a moodboard or analyzing marketing data.
Here's an example from our sister company, DevStats. You can see that for V1, there are 9 main tasks. Additional tasks have been relegated to V2 of the product.
.png) As you work through this process with your team, you should save any feature ideas that aren't essential to drive revenue and keep track of them as potential updates for V2 of your product.
As you work through this process with your team, you should save any feature ideas that aren't essential to drive revenue and keep track of them as potential updates for V2 of your product.
If users don't need the feature to achieve their core desire and get the main task done, it can wait.
Step 4. Determine your pillar feature
Next, you should clarify your pillar feature. This will be your guiding light for the prototype and will help you understand which user flows and screens to prioritize when developing your prototype.
So, how do you know what your pillar feature is?
It's the thing that—once you build it—you'll be able to sell your product and start earning revenue. Without it, your V1 is dead in the water. All other features play a supporting role.
Step 5. Develop your low-fidelity prototype
Now that you know what your pillar feature is (and are confident that your target audience really needs it), you're ready to build your low-fidelity prototype.
Use Figma or a similar tool to create the UX design for the most important screens and user flows.
Check our low-fidelity prototype examples above for inspiration. Remember that the prototype doesn't need to have branded colors or fonts. It just needs to showcase the buttons, settings, and actions users must take.
Step 6. Test your prototype with real users
We recommend showing your low-fidelity prototype to at least ten real users.
Set up a meeting and share the prototype with each user one by one. Don't explain the product. Instead, ask them to click through the screens and give their open-ended feedback on what they think about it.
You can rely on UserTesting to source testers that match your target user description. This platform is also ideal for hosting and recording the user testing sessions.
After you've allowed the user to give their unbridled feedback on your low-fidelity prototype, ask a few questions to get even more information on their needs and opinions:
How does this differ from your current solution to this problem?
Would you pay for this product?
How much would you pay for this product?
Does it meet your needs, or would you still need to use a competitor or overlapping tool?
If it doesn't meet your core needs...what feature is missing?
Step 7. Build your prototype if it's validated (or ditch it)
Now, you've got the information you need to move forward with building your prototype. If the feedback is mostly positive, the next stage is to create a high-fidelity prototype, incorporating any necessary changes.
A high-fidelity prototype iterates on user feedback and adds on-brand colors, fonts, and other UX elements.
If the feedback was negative or mixed, return to the drawing board. Consider another solution or pillar feature. Or, you might need to redefine your target audience or do more research to better understand their problems.
For expert help strategizing, designing, and validating your product, learn more about DevSquad’s product design squad. We’re a boutique product development agency specializing in SaaS and digital transformation.

Dayana Mayfield is a SaaS copywriter and content marketer specializing in SaaS marketing, positioning, and go-to-market strategy. She has consulted for over 195 SaaS companies, focusing on both traffic and conversions. She has been featured in Entrepreneur, Forbes, and Business Insider. Outside of work, Dayana writes SciFi novels and spends her evenings surviving auditions, rehearsals, and tech week as a proud theater mom.